Methods to Contribute
- Google Forms
- Github Repository
Google Forms
Fill out the form linked here. TODO insert gform link that has detailed instructions in the form
For the following categories feel free to include html tag formatting in your text responses to be rendered on the final page.
- summary
- description_content
- materials_content
- process_steps
- additional_notes
Github Repository
First Contributions
Steps 1 and 6 explain using Github to generally contribute to repositories, if you are experienced with github feel free to skip those steps.
If you’re not comfortable with the command line, here are tutorials using GUI tools.
If you don’t have git on your machine, install it.
Creating a local version on your computer.
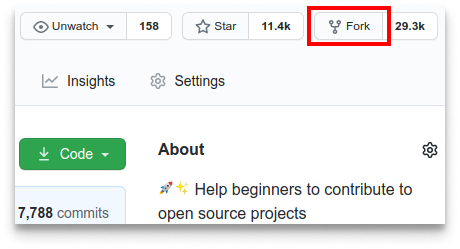
Fork this repository
Fork this repository by clicking on the fork button on the top of this page. This will create a copy of this repository in your account.
Clone the repository
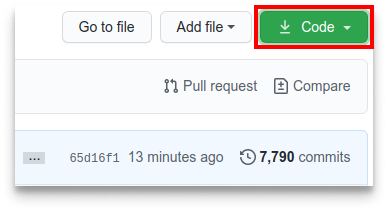
Now clone the forked repository to your machine. Go to your GitHub account, open the forked repository, click on the code button and then click the copy to clipboard icon.
Open a terminal and run the following git command:
git clone "url you just copied"
where “url you just copied” (without the quotation marks) is the url to this repository (your fork of this project). See the previous steps to obtain the url.

For example:
git clone git@github.com:this-is-you/first-contributions.git
where this-is-you is your GitHub username. Here you’re copying the contents of the first-contributions repository on GitHub to your computer.
Create a branch
Change to the repository directory on your computer (if you are not already there):
cd first-contributions
Now create a branch using the git switch command:
git switch -c your-new-branch-name
For example:
git switch -c add-alonzo-church
Creating a folder to store your files
Navigating into the top-level folder
For this example we are going to be creating an additional protocol in the Covid sub-directory
cd Protocols/covid
Creating a new sub-folder
If you do not see an appropriate already created sub-folder for your protocol you can create a sub-folder protocol (ex. making a flu sub-folder) using:
cd Protocols
mkdir flu
cd flu
After creating a sub-folder make a new directory file (using the convention <item>-Directory.md)
touch Flu-Directory.md
Inside of this markdown file you should have the following information.
---
layout: default
title: Flu Directory
parent: Protocols
nav_order: 1.5
has_children: true
summary: "<div style='margin-left: 2em; margin-top: 0.5em'> SUMMARY HERE </div>"
---
The items to modify from this basic structure would be:
- title which would be the name of the file using the same naming convention of <item> Directory.
- parent which is the top-level folder that this sub-folder is located in.
- summary which is the summary of what types of protocols the sub-folder (here Flu) would contain. Please keep the summary to approximately 64 characters and replacing “Summary Here” with your summary.
Creating your new folder in the sub-folder
Please use the same name-convention for the folder as well as all of the files that you will have in the folder.
mkdir Immunization-Testing
cd Immunization-Testing
Next create two files (a markdown and python file) using the same name as the folder that you will be inserting your information into to share.
touch Immunization-Testing.py
touch Immunization-Testing.md
Formatting your files
NOTICE: you will be able to create a form for others to select values from to vary how your protocol could run. When other users download your protocol they will be downloading the python file that you included and a json file that will have values from the form you create. This means that you will need to open and load values from this json file (which will have the same naming convention as all of the other files you have created in step 2 such as Immunization-Testing.json) in your python file (see link on how to load and access file contents in python for modification in your protocol program).
Markdown contents and General Layout Reference
This will be the general layout of content for a new protocol which will be contained in your .md file.
---
layout:
title:
author:
author_link:
grand_parent:
parent:
summary:
description_content:
materials_content:
protocol_setup:
  - question:
    label:
    key_value:
    type:
    step:
  - question:
    label:
    type:
    key_value:
    option_values:
      - text:
        value:
      - text:
        value:
process_steps:
additional_notes:
Formatting requirements for each key/value pair
- layout will contain the format sheet that will render the rest of the key/value pairs in this
.mdfile.
Example for a protocol layout (each layout style is the singular lowercase version of the top-level folder’s name):
layout: protocol
- title is for the name of the folder that you have created and named all of your files after without any hyphens.
Such as:
title: Immunization Testing
- author is your name or your organization’s name.
Example: (please include double quotes around the name used)
author: "Opentrons (verified)"
- author_link is any method (ex. Discord, E-mail, website, etc.) that you would like to be conteacted with by users that use your protocol.
Example: (please include double quotes around the linked source)
author_link: "https://opentrons.com/"
- grand_parent is the name of the top-level folder that you have inserted your content into.
Example
grand_parent: Protocols
- parent is the name of the markdown file inside of the grand_parent’s sub-folder that you created your protocol in. It normally is in the format of
<capitalized-sub-folder-name>-Directory.md
Example for Protocols > covid directory structure
parent: Covid Directory
- summary is the summary of your protocol and its use-case that will be displayed as a short description on the parent directory page.
Example:
summary: "<div style='margin-left: 2em; margin-top: 0.5em'>This flexible protocol is designed for commercial RNA extraction workflows in COVID-19 sample processing, with steps including binding buffer addition, bead washing, and final elution. Lysed samples are loaded on a magnetic module in a NEST 96-deepwell plate for traceability and consistency. Complex parameters such as tips conservation and tracking can be set for efficient runs.</div>"
Please keep summaries inside of the <div> structure to a maximum of 64 words.
- description_content is the first section of content about your protocol that should fully detail what the protocol is used for and give a brief intro into the form options that you allow.
Please feel free to use plain html formatting tags (no styling on any of your tags).
For multi-line formatting.[^1]
- materials_content is a list of materials with links to a list of materials that will be used with your protocol.
Please feel free to use plain html formatting tags (no styling on any of your tags).
For multi-line formatting.[^1]
- protocol_setup is a YAML formatted object containing the necessary information to render an html form whose responses will be used in your python program.
All questions contain
  - question:
    label:
    key_value:
    type:
- *question* is the string integer numbering of the question.
Example: `question: "1"`

- *label* contains the units necessary for the value that is sought from the question. Please format with as a double quoted string with the first and last character inside of the quoted string being a space.
Example: `label: " magnetic engage height (in mm) "`

- *key_value* is the key name that will be used to access the json value in your python program for this user defined value
Example: 'key_value: "mag_height"

- *type* is the type of question asked from either: "number" or "selector"
Additional question type requirements
Each question type requires specific additional fields to the above base fields

- *"number"*, requires a step amount for the numbers used, any positive number is applicably, but commonly either "1" or "any"
Example: `step: "any"`


- *"selector"*, requires an additional subset of key value pairs to provide options that a user can select from

General Format Example:

```
option_values:
  - text: "yes"
    value: "true"
```

	- *text* contians the short response to select from
	- *value* contains the value that you will look for in the created json file that you will read from in your python file (**be careful** for formatting of values as they will all be stored as string values in json).
- process_steps is a list of steps (only needing to include
<li>for each step) for running your protocol.
For multi-line formatting.[^1]
- additional_notes is a space for any additional comments that you would like to make about your protocol.
Please feel free to use plain html formatting tags (no styling on any of your tags).
For multi-line formatting.[^1]
Linked References
TODO add a template that could be referenced and other helpful links to be linked in their .md files
Local changes commit and merge request to main public repository
Committing your changes
If you go to the project directory and execute the command git status, you’ll see there are changes.
Add those changes to the branch you just created using the git add command:
git add Contributors.md
Now commit those changes using the git commit command:
git commit -m "Add your-name to Contributors list"
replacing your-name with your name.
Push changes to GitHub
Push your changes using the command git push:
git push -u origin your-branch-name
replacing your-branch-name with the name of the branch you created earlier.
If you get any errors while pushing, click here:
Authentication Error
fatal: Authentication failed for 'https://github.com/\<your-username\>/first-contributions.git/'
Go to GitHub's tutorial on generating and configuring an SSH key to your account.
Submit your changes for review
If you go to your repository on GitHub, you’ll see a Compare & pull request button. Click on that button.
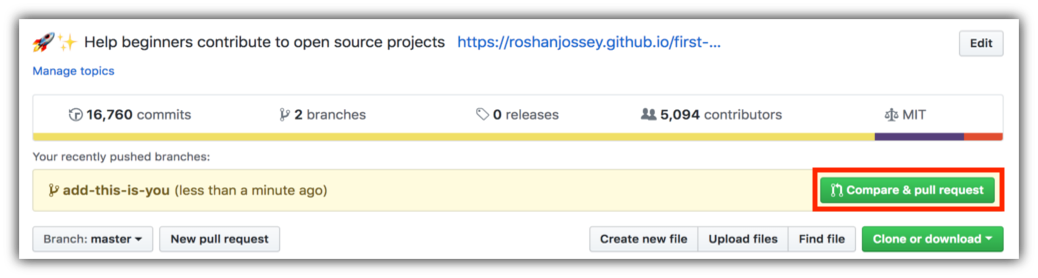
Now submit the pull request.

Soon we will be merging all of your changes into the main branch of this project, after formatting checks are processed. You will get a notification email once the changes have been merged.